
DIY measuring guide
Getting your measurements right is the most important step to a perfect fit. Follow this simple guide, and remember to take your time and double-check your numbers. If you need any help during the measuring process, please don’t hesitate to call our team on 1800 482 777 or visit our contact form.
Spring System: The minimum width is 300mm (with a minimum drop of 800mm) or 400mm wide for drops under 800mm.
Motorised System: The minimum size is 525mm wide by 400mm high. Please contact us for maximum size specifications.
Before you start
- What you’ll need: A metal tape measure, a pen and paper, and a step ladder if needed.
- Measure every window: Even if they look the same, windows in the same room can have slight differences. Measure each one individually.
- Measure to the millimetre (mm): For a precise fit, all measurements must be in millimetres.
- Check for obstructions: Look for things that might get in the way of the blind frame, such as winders, locks, latches, handles or mullions.

Choose your style
This is your first and most important decision. To make the right choice, it’s essential to first understand your roll type.
- Inside mount (recess fit) This is when the blind fits neatly inside the window frame (the recess).
- Choose this if: You have enough clear, unobstructed depth in your window frame. It provides a clean, built-in look.
- Inside Mount – Forward Roll: The fabric rolls off the front of the tube, away from the window. This is ideal for clearing obstructions like handles and offers a very flush, clean finish within the recess.
- Inside Mount – Rear Roll: The fabric rolls off the back of the tube, closer to the window. This provides a tighter fit against the window, minimising light gap, but may interfere with obstructions.
- Inside Mount – Forward Roll: The fabric rolls off the front of the tube, away from the window. This is ideal for clearing obstructions like handles and offers a very flush, clean finish within the recess.
- Outside Mount (Face fit) This is when the blind is mounted on the wall or architrave outside the window frame.
- Choose this if: Your window recess is too shallow, has obstructions (like large handles), or you prefer to block out more light by covering a larger area around the window.


Follow these steps to measure inside your window frame (recess) for a Forward Roll. This mount is ideal for clearing obstructions like handles and provides a clean, flush finish with your wall.
Step 1: Check your recess depth
You must have enough clear space inside your window frame for the headbox (pelmet) and side tracks.
- Top clearance (for the headbox): In the top section of your window (the first 85mm from the top), you need a minimum of 64mm of clear, unobstructed depth.
- Side and bottom clearance (for the tracks): For the rest of the window’s height (from 85mm down to the sill), you need a minimum of 26mm of clear, unobstructed depth.
Important: If you don’t have this required depth, you will need to select an Outside Mount (Face Fit).
Step 2: Measure the WIDTH
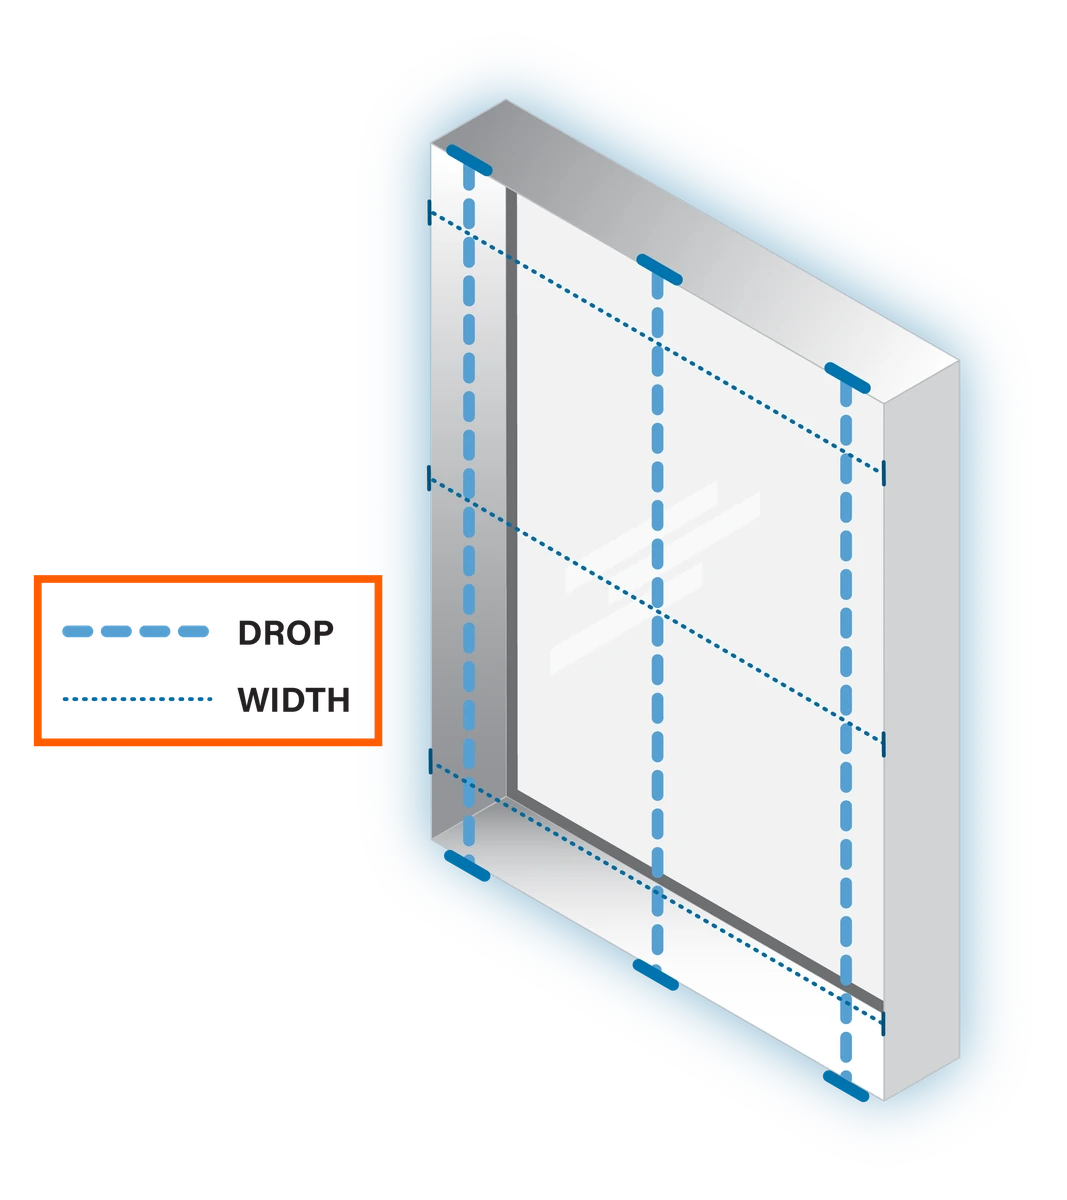
Window frames are often not perfectly square. To ensure a correct fit, you must measure the width in three places:
- Measure the width at the Top.
- Measure the width in the Middle.
- Measure the width at the Bottom.
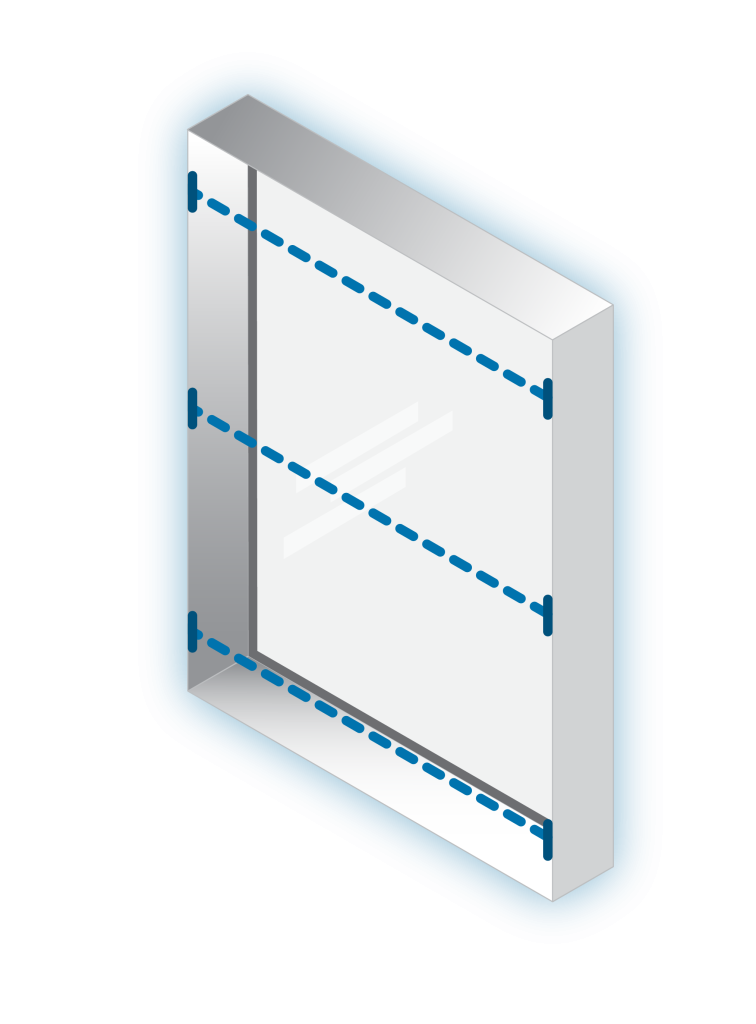
Provide us with the SMALLEST of these three measurements. This ensures your blind will fit perfectly, even if the window is tapered.
Step 3: Measure the DROP (Height)
You also need to measure the drop (or “height”) in three places:
- Measure the height on the Left.
- Measure the height in the Centre.
- Measure the height on the Right.
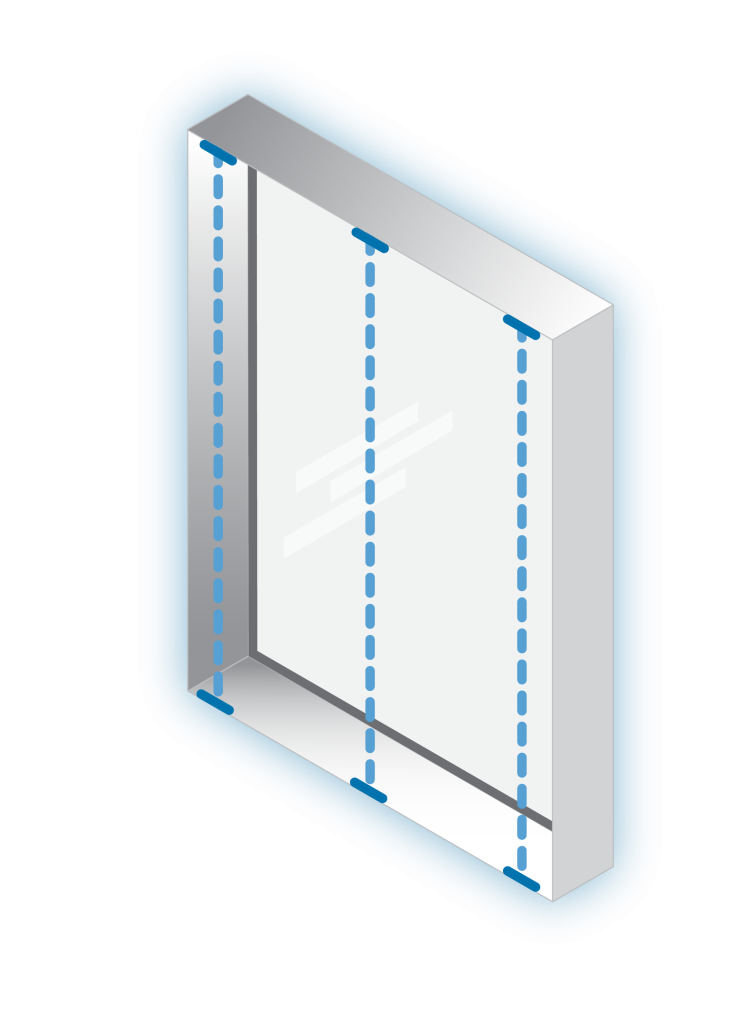
Provide us with the SMALLEST of these three measurements. We build a perfectly square blind frame, so using the smallest height ensures it will fit. Our expanding light-seal is designed to fill any small gaps created by an unlevel windowsill.
Follow these steps to measure inside your window frame (recess) for a Rear Roll. It fits deep in the recess (close to the glass) and leaves your internal windowsill space free.
Step 1: Check your recess depth
You must have enough clear, unobstructed depth inside your window frame. Check your depth from the window glass (or first obstruction) to the front edge of the recess. This mount is usually not suitable for windows with obstructions like handles or winders.
- Minimum Depth (Partial Recess): You need at least 26mm of clear depth. With this option, the headbox (pelmet) will protrude slightly from the window recess.
- Flush Fit (Fully Recessed): For the blind to sit perfectly flush with your wall for a seamless, built-in look, you need 64mm of clear depth.
Important: You must have at least the minimum 26mm depth. If you have less than 26mm, or if you have any obstructions in the recess, you will need to select an Outside Mount (Face Fit).
Step 2: Measure the WIDTH
Window frames are often not perfectly square. To ensure a correct fit, you must measure the width in three places:
- Measure the width at the Top.
- Measure the width in the Middle.
- Measure the width at the Bottom.
Provide us with the SMALLEST of these three measurements. This ensures your blind will fit perfectly, even if the window is tapered.
Step 3: Measure the DROP (Height)
You also need to measure the drop (or “height”) in three places:
- Measure the height on the Left.
- Measure the height in the Centre.
- Measure the height on the Right.
Provide us with the SMALLEST of these three measurements. We build a perfectly square blind frame, so using the smallest height ensures it will fit. Our expanding light-seal is designed to fill any small gaps created by an unlevel windowsill.

For a outside mount the goal is to cover the window opening entirely. You will need at least 25mm of flat mounting surface on the wall or architrave the entire way around your window.
Note: Choose this option if your window recess depth is restricted by a fly screen track or if you prefer the look of the blind covering the architrave.
Measure to the outside edge of the architrave. This ensures complete coverage.
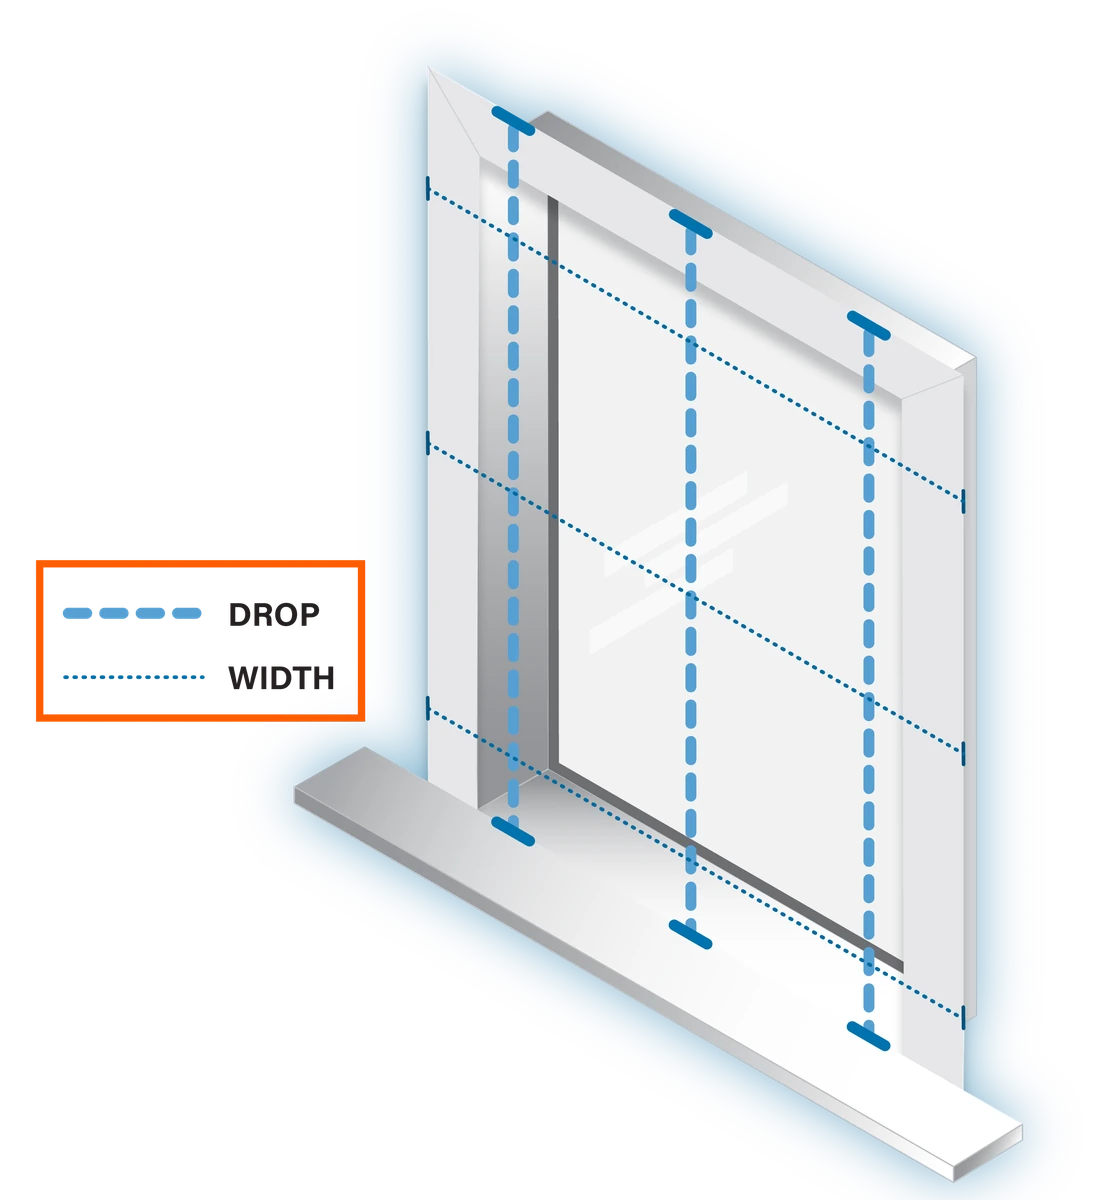
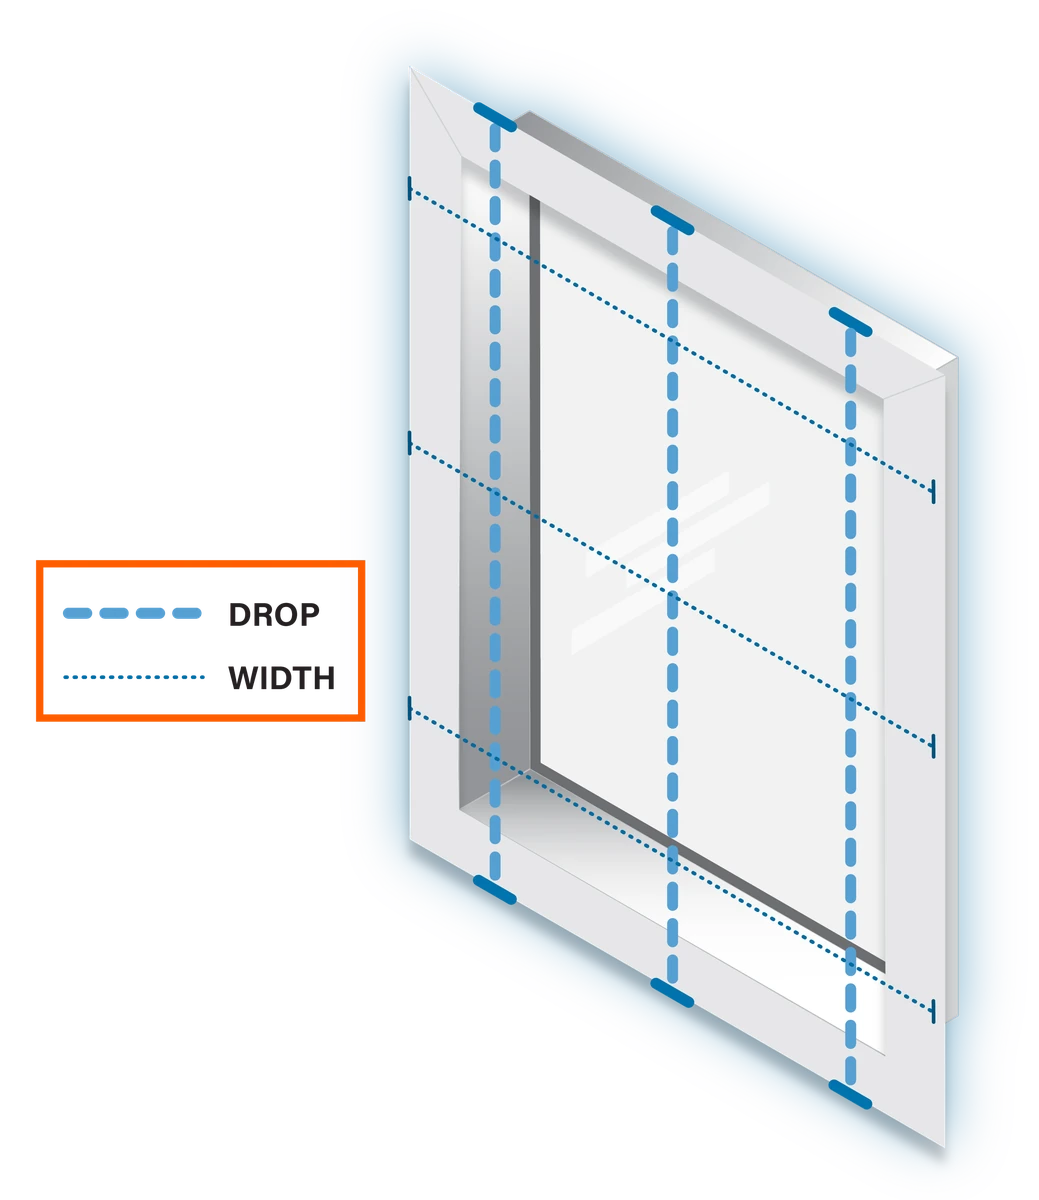
Width: Measure from the outside edge of the left architrave to the outside edge of the right architrave.
- Measure the width at the Top.
- Measure the width in the Middle.
- Measure the width at the Bottom.
Provide us with the SMALLEST of these three measurements. This ensures your blind will fit perfectly, even if the window is tapered.
Drop (Height): Measure from the outside edge of the top architrave to the top of your window sill, or to the outside edge of the bottom architrave if you have one.
- Measure the height on the Left.
- Measure the height in the Centre.
- Measure the height on the Right.
Provide us with the SMALLEST of these three measurements. This ensures your blind will fit perfectly, even if the window is tapered.
You will be mounting the blind system directly onto the flat wall around your window. You must add an overlap to your window opening measurements to make room for the hardware (pelmet and tracks).
Important: Check for wall obstructions first Before measuring, check the flat wall around your window for obstructions (light switches, vents, etc.). While the hardware requires a bare minimum of 25mm of flat wall to be mounted, the side tracks are actually 42mm wide and the top pelmet is 85mm high.
To ensure the tracks align perfectly with the edge of your window opening (and don’t overhang into the glass area), we use these full hardware dimensions. You must check that you have at least 42mm of clear, flat wall space on the sides and 85mm of clear space above the opening. If any obstructions are in this area, you will not have enough clear space to mount the system as intended.

Width: Measure the exact window opening, then add a minimum of 42mm to each side (84mm total).
- Measure the width at the Top.
- Measure the width in the Middle.
- Measure the width at the Bottom.
Provide us with the SMALLEST of these three final measurements.
Height: Measure the exact window opening, then add a minimum of 85mm to the top and 25mm to the bottom.
- Measure the height on the Left.
- Measure the height in the Centre.
- Measure the height on the Right.
Provide us with the SMALLEST of these three final measurements.
The “extra dimensions” or “overlap” you add are the minimum physical space required to mount this hardware.
- For Windows WITH Architraves: Your architrave is the mounting surface. This is why it must have at least 25mm of flat, mountable space for the tracks to be installed. By measuring to the outside edge of the architraves, you are providing the exact total dimensions for the blind frame to sit securely on top of them.
- For Windows WITHOUT Architraves (Plaster Walls): Since there’s no trim, we must create this mounting surface by adding specific amounts to your window opening size. These additions correspond directly to the size of the components:
- +85mm (Top): Required for the height of the top pelmet.
- +42mm (Each Side): Required for the width of the side tracks.
- +25mm (Bottom): Required for the height of the bottom track/seal.
In both cases, these measurements ensure the system is mounted securely on the wall, completely sealing the window for a total blockout.
Have you labeled your measurements clearly? (e.g., “Bedroom 1 Width,” “Bedroom 1 Height”).
Did you use a metal tape measure? Soft tapes can stretch and be inaccurate.
Did you measure straight? Measuring on an angle or bending the tape will give you an incorrect, longer measurement.



Motorisation details (For motorised blinds only)
If you are ordering a motorised blind, you need to specify which side the motor and its charging port should be located on.
How to choose your motor side
Stand inside your room, facing the window. Consider which side of the window is easier to access or is closer to a power outlet for convenient charging.
When placing your order, you will be asked to select either:
- Left charging port side
- Right charging port side
